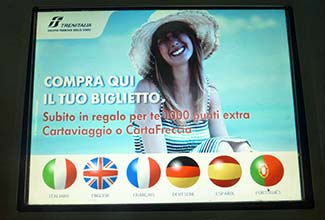
Step 1: Select a
language by tapping an icon on the opening screen. (On this two-tone green
Biglietto Veloce machine, your choices include Italian, English, French,
German, Spanish, and Portuguese.)
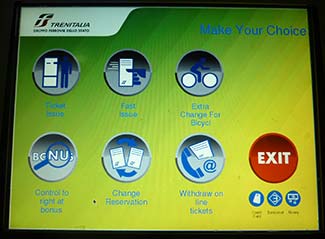
Step 2: Select "Ticket
Issue" (the icon at upper left) unless you're paying for a bicycle, changing a
reservation, picking up a ticket that you bought online, etc.
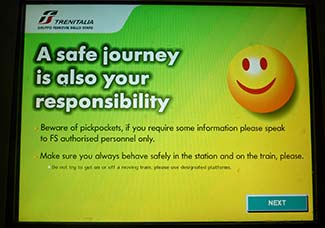
Step 3: This
informational screen warns you against pickpockets and unsafe behavior in the
station or on the train. Simply click "Next" to continue.
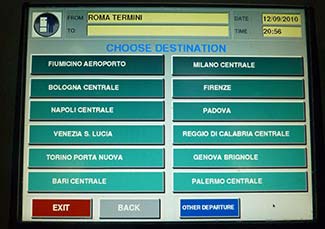
Step 4: Click a box on the "Choose Destination" screen,
or click the blue "Other departure" box if your destination isn't shown. (In
this example, we'll pick
"Fiumicino Aeroporto," the main internation airport in Rome.)
- Note: By default, the
machine assumes that you're departing from the station where you're buying a
ticket--in this case, Roma Termini, which is shown in the yellow box at the top
of the screen.
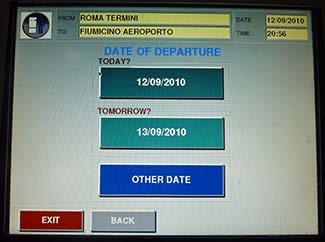
Step 5: Indicate your
date of departure. (The exact date won't matter unless you're traveling on a
train with reservations, but you can't get to the next screen without making a
choice.)
- Note: Trenitalia
tickets are normally valid for two months from the date of issue.
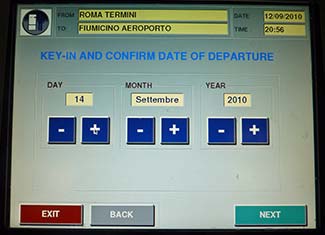
Step 6: If you chose
"Other date" in Step 5 (as we did), you'll see this screen. Use the
- and +
buttons to adjust the date, month, and/or year. Then click "Next" to continue.
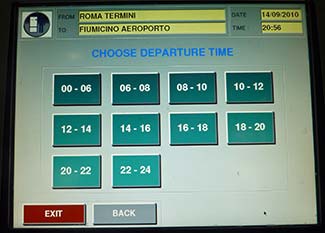
Step 7: Indicate the
time range when you'll be leaving. (Again, this may be academic if you're
traveling on a train that doesn't require reservations, but you'll need to make
a choice before you can continue.)
The times are based on a 24-hour clock: "00-06" means "midnight
to 6 a.m.," for example, while "20-22" means "8 p.m. to 10 p.m."
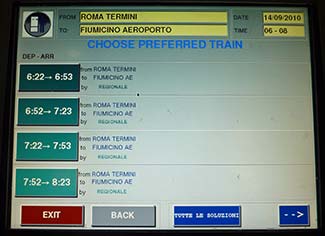
Step 8: This "Choose
Preferred Train" screen shows a timetable of departures to your destination
during the time range that you've chosen.
Click a time, or click either of the blue buttons.
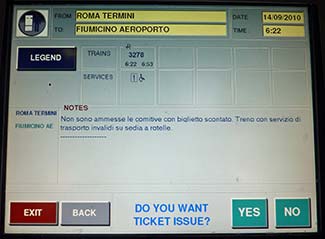
Step 9: Click "Back"
if you want to change your selections, or click "Yes" if you're ready to buy a
ticket.
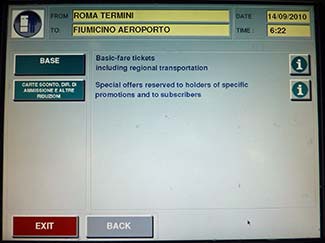
Step 10: Click "Base"
unless you have a special promotion code.
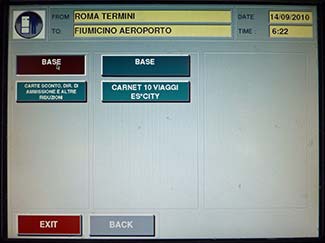
Step 11: Click the
blue "Base" button at right unless you want a carnet of 10 tickets.
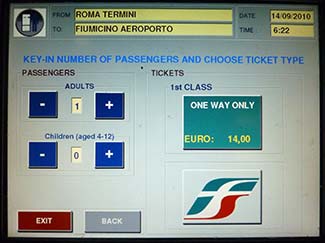
Step 12: Select the
number of adult passengers and children from 4-12. (Children under 4 travel
free.) Then click the large green button under "Tickets" to continue.
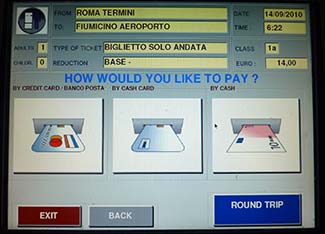
Step 13: Review your
choices, then select your payment type:
- Credit card
- Cash or debit card
- Cash
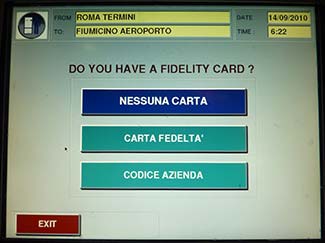
Step 14: Unless you
have a Trenitalia loyalty card or agency number, click the blue "Nessuna
Carta" button.
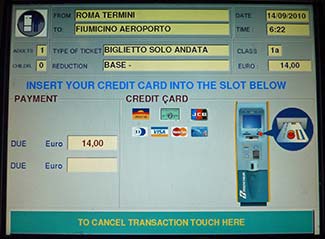
Step 15: Follow the
payment instructions. In this case, we were told to insert our credit card as
indicated in the diagram.
- Good news for overseas visitors:
Unlike ticket machines in some other European countries, such as France, the
Trenitalia machines will accept U.S., Canadian, and other
magnetically-striped credit cards without microchips.
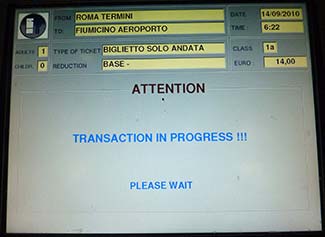
Step 16: Wait while
the machine processes your payment.
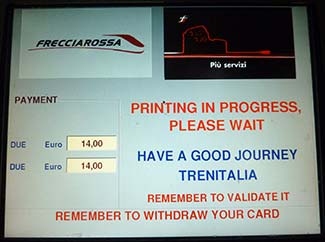
Step 17: After
processing your payment, the machine will print your ticket.
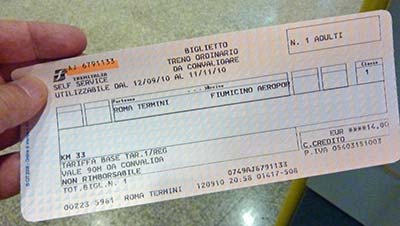
Step 18: Remove your
ticket from the receptacle on the front of the machine.
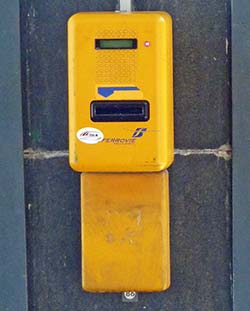
Step 19: Immediately
before boarding your train, validate your ticket in one of the yellow stamping
machines on the platform. (Listen for a "clunk" and check your ticket afterwards
to make sure that it was stamped.)
- Don't forget this step!
If the train conductor sees that your ticket isn't stamped, you may be charged a
hefty fine.